Top Ad 728x90

Saturday, June 14, 2025

Best Grilled Cheese Burrito

by


Here’s the ultimate Grilled Cheese Burrito — melty, crispy, cheesy, and stuffed with seasoned beef, rice, and all your favorite fixings. Inspired by the popular Taco Bell version, but even better homemade!


๐Ÿง€๐Ÿ”ฅ Best Grilled Cheese Burrito

Ingredients

For the Filling:

  • 1 lb ground beef
  • 1 packet taco seasoning (or 2 tbsp homemade)
  • 1/4 cup water
  • 1 cup cooked rice (white, Mexican, or cilantro lime)
  • 1/2 cup nacho cheese sauce or shredded cheddar
  • 1/2 cup sour cream
  • 1/2 cup chipotle mayo or spicy ranch (optional but delicious)
  • 1 cup shredded lettuce (optional)
  • 1/2 cup diced tomatoes
  • 1/2 cup shredded cheese (cheddar or Mexican blend)

For the Burrito Wrap:

  • 4 large flour tortillas (burrito-size)
  • 1 1/2 cups shredded cheese (for grilling the outside)
  • Butter or oil for the pan

๐Ÿ‘จ‍๐Ÿณ Instructions

1. Cook the Beef

  • In a skillet, brown the ground beef over medium heat.
  • Drain fat, then add taco seasoning and water. Simmer until thickened, about 5 minutes. Set aside.

2. Assemble the Burritos

  • Warm tortillas slightly so they’re pliable.
  • In the center of each tortilla, layer:
    • A scoop of seasoned beef
    • A spoonful of rice
    • Nacho cheese or shredded cheese
    • A dollop of sour cream
    • A drizzle of chipotle mayo (optional)
    • A handful of lettuce and tomatoes
  • Roll up burritos tightly (fold in the sides first, then roll up from the bottom).

3. Grill with Cheese

  • In a non-stick skillet, add a handful of shredded cheese directly to the pan over medium heat.
  • Place the burrito seam-side down on top of the melting cheese.
  • Let cook for 1–2 minutes until the cheese melts and sticks to the tortilla.
  • Flip and lightly toast the other side.

Optional: Brush the outside of the burrito with a little melted butter for extra crispiness.

4. Serve

  • Slice in half and serve hot with extra sour cream, salsa, or guacamole.

๐ŸŒŸ Tips & Variations:

  • Add crushed tortilla chips inside for crunch.
  • Swap beef for chicken, black beans, or soy crumbles for a different twist.
  • Want it spicier? Add jalapeรฑos, hot sauce, or spicy queso inside.

Would you like a vegetarian version, or want it air-fryer friendly?


Cajun Shrimp Sausage Dirty Rice

by


Here’s a bold and flavorful recipe for Cajun Shrimp & Sausage Dirty Rice – a one-pot Southern classic loaded with smoky sausage, juicy shrimp, Cajun spices, and hearty rice. Perfect for a weeknight dinner or meal prep!


๐Ÿค๐ŸŒถ️ Cajun Shrimp & Sausage Dirty Rice

Ingredients

Proteins:

  • ½ lb (225g) shrimp, peeled & deveined
  • ½ lb (225g) andouille or smoked sausage, sliced
  • 1 tbsp Cajun seasoning (plus more for shrimp)

Vegetables:

  • 1 small onion, finely diced
  • 1 bell pepper (any color), diced
  • 2 celery stalks, diced
  • 3 cloves garlic, minced
  • 2 green onions, sliced (for garnish)

Rice & Liquid:

  • 1 cup long grain white rice (uncooked)
  • 2 cups chicken broth (or water with bouillon)
  • 2 tbsp tomato paste (optional for richness)
  • 2 tbsp oil or butter (for cooking)

๐Ÿ‘จ‍๐Ÿณ Instructions

1. Season & Sear Shrimp

  • Toss shrimp with a little Cajun seasoning and set aside.
  • Heat 1 tbsp oil in a large skillet or pot over medium heat.
  • Sear shrimp for 1–2 minutes per side, until just pink. Remove and set aside.

2. Cook Sausage & Veggies

  • In the same pan, add a little more oil if needed and cook sliced sausage until browned.
  • Add onion, bell pepper, and celery, and sautรฉ for 5 minutes.
  • Stir in garlic and cook 1 more minute.

3. Add Rice & Broth

  • Stir in uncooked rice, tomato paste (if using), and 1 tbsp Cajun seasoning. Toast the rice for 1 minute.
  • Pour in chicken broth and bring to a boil.
  • Reduce heat, cover, and simmer for 15–18 minutes, or until rice is tender and liquid is absorbed.

4. Finish with Shrimp

  • Once rice is cooked, gently fold in the cooked shrimp.
  • Let sit, covered, for 5 minutes to steam and let flavors meld.

5. Garnish & Serve

  • Fluff rice with a fork.
  • Garnish with green onions and serve hot!

๐ŸŒŸ Tips & Variations:

  • Spicy Kick: Add cayenne or hot sauce to taste.
  • Veggie Boost: Add diced tomatoes or corn for color and sweetness.
  • Make it a Meal Prep: Holds well in the fridge for up to 4 days.

Let me know if you want a low-carb version, or a slow cooker adaptation!


Cheesy Taco Potatoes

by


Here’s a simple and delicious Cheesy Taco Potatoes recipe — perfect for a quick dinner, game day, or party dish. It combines crispy roasted potatoes, seasoned taco meat, melted cheese, and all your favorite toppings!


๐Ÿง€๐ŸŒฎ Cheesy Taco Potatoes

Ingredients

For the Potatoes:

  • 4 cups diced potatoes (Yukon gold or russet), ½-inch cubes
  • 2 tbsp olive oil
  • 1 tsp garlic powder
  • 1 tsp onion powder
  • ½ tsp paprika
  • Salt & pepper to taste

For the Taco Meat:

  • 1 lb ground beef (or ground turkey)
  • 1 packet taco seasoning or 2 tbsp homemade taco seasoning
  • ¼ cup water

For Topping:

  • 1½ cups shredded cheddar or Mexican cheese blend
  • ½ cup diced tomatoes (optional)
  • ¼ cup chopped green onions
  • ¼ cup sour cream or taco sauce
  • Jalapeรฑos, cilantro, or avocado (optional)

๐Ÿ‘จ‍๐Ÿณ Instructions

1. Roast the Potatoes

  • Preheat oven to 425°F (220°C).
  • Toss diced potatoes in olive oil, garlic powder, onion powder, paprika, salt, and pepper.
  • Spread on a baking sheet in a single layer.
  • Roast for 25–30 minutes, flipping halfway, until golden and crispy.

2. Cook the Taco Meat

  • While the potatoes roast, cook ground beef in a skillet over medium heat until browned.
  • Drain excess grease.
  • Stir in taco seasoning and water, and simmer for about 5 minutes until thickened.

3. Assemble & Bake

  • Transfer roasted potatoes to a baking dish or keep them on the sheet pan.
  • Top with taco meat and sprinkle generously with shredded cheese.
  • Return to the oven and bake for 5–7 minutes, or until cheese is melted and bubbly.

4. Top & Serve

  • Remove from oven and top with your favorite toppings: green onions, tomatoes, sour cream, jalapeรฑos, cilantro, or avocado.
  • Serve warm and enjoy!

๐ŸŒŸ Tips:

  • Want it spicy? Add hot sauce or use pepper jack cheese.
  • Great for meal prep — store leftovers in an airtight container for up to 3 days.
  • Make it a one-skillet meal by using an oven-safe skillet for both cooking and baking.

Let me know if you want a vegetarian version or a casserole-style twist!


Fluffy Castella Sponge Cake

by


Here's a classic Fluffy Castella Sponge Cake recipe – light, moist, and delicately sweet with a beautiful golden top. Castella (or Kasutera) is a traditional Japanese sponge cake made without any leavening agents, relying solely on whipped eggs for its airy texture.


๐Ÿฐ Fluffy Castella Sponge Cake Recipe

Ingredients:

  • 6 large eggs (room temperature)
  • 150 g (3/4 cup) granulated sugar
  • 2 tbsp honey
  • 2 tbsp warm milk
  • 120 g (1 cup) cake flour (sifted)
  • 1 tbsp vegetable oil or melted unsalted butter (optional, for extra moisture)

Optional Toppings:

  • Extra honey mixed with warm water (for brushing)
  • Parchment paper or wooden mold lining (to get that signature shape)

Instructions:

1. Prepare the Equipment:

  • Preheat oven to 160°C (320°F).
  • Line a loaf pan (or traditional Castella box mold) with parchment paper.

2. Mix Honey and Milk:

  • Combine the honey and warm milk in a small bowl and set aside.

3. Whip the Eggs and Sugar:

  • In a stand mixer (or using a hand mixer), whisk eggs and sugar on high speed for 7–10 minutes until the mixture becomes thick, pale, and triples in volume.
  • The batter should form ribbons when you lift the whisk.

4. Add Honey Mixture:

  • Reduce to low speed and slowly pour in the honey-milk mixture. Mix for another 30 seconds.

5. Fold in the Flour:

  • Sift in cake flour in batches and fold gently with a spatula. Avoid overmixing to preserve the airy structure.

6. Optional: Add Oil/Butter:

  • Fold in 1 tbsp of oil or melted butter for a slightly richer texture, but this is optional.

7. Pour and Tap:

  • Pour the batter into the lined mold. Tap the pan lightly on the counter to remove air bubbles.

8. Bake Low and Slow:

  • Bake at 160°C (320°F) for 35–45 minutes until the top is golden brown and a skewer comes out clean.

9. Cool and Rest:

  • Remove from oven and cover the cake with a sheet of plastic wrap while it's warm to retain moisture.
  • Let it rest overnight (wrapped and chilled) before slicing for the best texture.

Tips for Success:

  • Eggs must be at room temperature to whip properly.
  • For an ultra-smooth top, use a spatula to smooth the surface of the batter before baking.
  • Aging the cake overnight improves the flavor and moisture.

Would you like a version with matcha, chocolate, or a gluten-free adaptation?


Friday, June 13, 2025

MILK MOCHI BITES

by


๐Ÿฅ› MILK MOCHI BITES

SOFT – CHEWY – CREAMY – DELICIOUS!


INGREDIENTS:

  • 1 CUP MILK
  • 1/4 CUP HEAVY CREAM (OPTIONAL)
  • 1/4 CUP SUGAR
  • 1/2 CUP GLUTINOUS RICE FLOUR (MOCHIKO)
  • 1 TABLESPOON CORNSTARCH (OPTIONAL)
  • A PINCH OF SALT
  • 1/2 TEASPOON VANILLA EXTRACT (OPTIONAL)
  • POTATO STARCH OR CORNSTARCH (FOR DUSTING)

INSTRUCTIONS:

1. MIX INGREDIENTS:

IN A NONSTICK SAUCEPAN, WHISK TOGETHER:

  • MILK
  • HEAVY CREAM
  • SUGAR
  • GLUTINOUS RICE FLOUR
  • CORNSTARCH
  • SALT
  • VANILLA EXTRACT

2. COOK:

COOK OVER MEDIUM-LOW HEAT,
STIR CONSTANTLY UNTIL IT BECOMES A THICK, STICKY DOUGH.
THIS TAKES ABOUT 5–8 MINUTES.


3. SHAPE:

TRANSFER TO A SURFACE DUSTED WITH STARCH
OR A PARCHMENT-LINED TRAY.
LET IT COOL FOR A FEW MINUTES.


4. CUT:

FLATTEN AND CUT INTO SMALL BITE-SIZE PIECES.
ROLL EACH PIECE IN POTATO STARCH TO PREVENT STICKING.


TO SERVE:

EAT AT ROOM TEMPERATURE,
OR CHILL IN THE FRIDGE FOR A FIRMER,
CHEWIER TEXTURE.


Enjoy your chewy, creamy milk mochi bites!
Let me know if you want a chocolate-filled version or a vegan option.


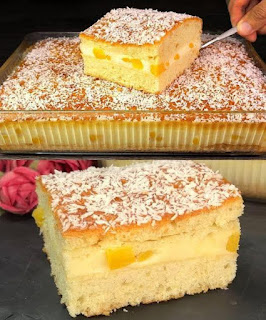
PEACH AND CREAM SPONGE CAKE

by


๐Ÿ‘ PEACH AND CREAM SPONGE CAKE

SOFT – CREAMY – COCONUT-TOPPED DELIGHT!


INGREDIENTS:

FOR THE SPONGE CAKE:

  • 4 LARGE EGGS
  • 1 CUP SUGAR
  • 1 CUP MILK
  • 1/2 CUP VEGETABLE OIL
  • 2 CUPS ALL-PURPOSE FLOUR
  • 1 TABLESPOON BAKING POWDER
  • 1 TEASPOON VANILLA EXTRACT

FOR THE CREAM FILLING:

  • 2 CUPS MILK
  • 1/2 CUP SUGAR
  • 2 TABLESPOONS CORNSTARCH
  • 1 TABLESPOON FLOUR
  • 1 TEASPOON VANILLA EXTRACT
  • 1 EGG YOLK
  • 1 TABLESPOON BUTTER

EXTRA:

  • 1 CAN DICED PEACHES (DRAINED)
  • SHREDDED COCONUT FOR TOPPING

DIRECTIONS:

MAKE THE SPONGE CAKE:

  1. PREHEAT OVEN TO 350°F (175°C).
  2. BEAT EGGS AND SUGAR UNTIL LIGHT AND FLUFFY.
  3. ADD MILK, OIL, AND VANILLA. MIX WELL.
  4. SIFT IN FLOUR AND BAKING POWDER. MIX UNTIL SMOOTH.
  5. POUR INTO A GREASED 9×13 INCH PAN.
  6. BAKE FOR 25–30 MINUTES. COOL COMPLETELY.

MAKE THE CREAM FILLING:

  1. IN A SAUCEPAN, COMBINE MILK, SUGAR, CORNSTARCH, FLOUR, AND EGG YOLK.
  2. COOK OVER MEDIUM HEAT, STIRRING CONSTANTLY, UNTIL THICK.
  3. REMOVE FROM HEAT. STIR IN BUTTER AND VANILLA.
  4. LET COOL SLIGHTLY.

ASSEMBLE THE CAKE:

  1. SLICE THE CAKE IN HALF HORIZONTALLY.
  2. SPREAD CREAM FILLING OVER THE BOTTOM LAYER.
  3. ADD DICED PEACHES EVENLY ON TOP.
  4. PLACE SECOND CAKE LAYER ON TOP.
  5. SPRINKLE WITH SHREDDED COCONUT.

CHILL & SERVE:

  • CHILL FOR AT LEAST 1 HOUR IN THE REFRIGERATOR.
  • SLICE AND ENJOY!

Let me know if you'd like this as a PDF or need a sugar-free or egg-free version!


Crispy Nacho Egg Rolls

by


Here's a crave-worthy recipe for Crispy Nacho Egg Rolls — a fusion of cheesy nacho goodness wrapped up in a crunchy, golden egg roll shell. Perfect for game day, parties, or a fun dinner!


๐ŸŒฎ Crispy Nacho Egg Rolls

Ingredients:

  • 1 lb ground beef (or ground turkey or chicken)
  • 1 packet taco seasoning (or homemade)
  • 1/4 cup water
  • 1/2 cup canned black beans (drained and rinsed)
  • 1/2 cup corn (fresh, canned, or frozen)
  • 1 cup shredded cheddar or Mexican blend cheese
  • 1/4 cup diced tomatoes or salsa
  • 1 small jalapeรฑo, minced (optional, for heat)
  • 10–12 egg roll wrappers
  • Oil for frying (vegetable or canola)

Optional for Serving:

  • Sour cream
  • Guacamole
  • Salsa
  • Nacho cheese sauce

๐Ÿ”ช Instructions:

  1. Cook the Filling: In a skillet, brown ground beef over medium heat. Drain grease. Add taco seasoning and water; stir until thickened (about 2–3 minutes). Add beans, corn, tomatoes (or salsa), and jalapeรฑos. Cook for another 2–3 minutes. Remove from heat and stir in the cheese.

  2. Assemble Egg Rolls: Lay out one egg roll wrapper with a corner facing you (diamond shape). Spoon 2–3 tablespoons of filling in the center. Fold bottom corner up over the filling, then fold in the sides, and roll up tightly. Seal edge with water. Repeat.

  3. Fry 'Em Up:

    • Frying Method: Heat about 1–2 inches of oil in a deep skillet or pot to 350°F (175°C). Fry egg rolls in batches, turning occasionally, until golden brown (about 3–4 minutes). Drain on paper towels.
    • Oven-Baked Option: Brush egg rolls with oil and bake at 400°F (200°C) for 18–20 minutes, flipping halfway.
    • Air Fryer: Spray lightly with oil and air fry at 390°F (200°C) for 10–12 minutes, turning once.
  4. Serve Hot: Serve with your favorite dips — sour cream, guac, or queso!


๐Ÿ”„ Variations:

  • Swap beef for shredded chicken or chorizo.
  • Add diced red onions or green chiles to the filling.
  • Sprinkle with crushed Doritos or tortilla chips before serving for extra crunch.

Want a freezer-friendly prep version or dipping sauce ideas?


Top Ad 728x90